
Thursday, October 31, 2013
DIY Halloween Skull
Tuesday, October 29, 2013
Pumpkin Cake Balls
A bunch of my friends and I had a girls night and the theme was PUMPKIN! We all brought a pumpkin treat and the recipes to share. My treat was theses little beauties.


They were really really easy to make too! So here is a step by step on how I did it!

These are all the ingredients you will need! (I didn't end up using the frosting I bought because the package of cake came with frosting. However, I wish I would have used the one I bought because I didn't think that the frosting inside the box was sweet enough.) Also I doubled this recipe, so all the ingredients you see here, I used 2. (Except I only used half the goldfish. . .you'll see why)
1. Start by following the baking directions on the box.

2. Bake in a 13X9 dish on 375. I cooked it for 15 minutes then checked it with a toothpick. I continued to cook at 2 minute intervals until the toothpick came out clean.

3. Then let the cake cool just enough to handle. Then crumble chunks into a mixing bowl. (I use the center or the cake because you want your cake balls as smooth as possible. The outer cake pieces can be a little rough to work with.) Then crumble even more with a fork.

4. This is where you add the frosting. Usually I use a "can" of frosting and mix it into the crumbles, but like I mentioned before this cake mix had packages of frosting so I used those. I would suggest using the other frosting, because I think they taste better. . . but you can really use whatever you want. Homemade frosting would be even better, if you're that amazing.
After I mixed in the frosting I put it in the fridge to harden a little to make it easier to roll into balls. About 5-10 minutes.

5. Then line a baking sheet with parchment paper. Roll the cake mix into little balls. Then place those in the fridge for another 10 minutes to harden. Meanwhile, put half of the goldfish crackers into a ziplock baggie and crush them into little crumbs.

6. After the crumbs, get the chocolate covering ready. I melted the almond bark in a large bowl in the microwave for 90 seconds. (I did one brick, and then did the other one when the first one was all gone.) After 90 seconds it wasn't quite done so I continued to heat and stir in 15 second increments. I did this until the chocolate was smooth and runny. (It was about an extra 45 seconds)

7. I then dropped the balls into the chocolate one at a time and dished them out with a large spoon. I placed them on a large fork to allow the extra chocolate to drip off, then transferred them back onto the parchment paper to harden. While they were still wet I sprinkled some of the chocolate goldfish crumbs on top.

8. After they hardened, I drizzled the packet of caramel over them that came in the cake box. I ended up having extra melted almond bark so I covered the rest of the goldfish and some nuts to make some yummy treats and put them in a cookie jar. My daughter loved them! After that, ENJOY!

The awesome part about this recipe is that you can do it with ANY kind of cake, ANY kind of frosting, and ANY kind of toppings! Just be creative and enjoy the deliciousness!
Had a great night enjoying all the yummy treats and friends!

Let me know if you try these amazing little morsels and how you like them! Love you all. Thanks for reading!
Friday, October 25, 2013
Black Widow Jessica
So my sister Jessica is pretty much a man eater so she decided to be none other than Black Widow for Halloween this year! haha just kidding Jess!
I totally think she looks a ton like Scarlett Johansson anyway, so when she decided to be her for Halloween I was pumped. We dyed her hair and did her makeup and she made her awesome costume!
I was dumb and didn't take a before picture because we were filming the whole transformation for my youtube channel. But when I dumped the footage from my card onto my computer, for some reason it didn't save. Yes I was very angry. . . and I'm still bitter. BUT oh well. I'll just show you her before and afters!

From beautiful blonde, to riveting red!

I'm sorry I don't have product descriptions on what we did because my lame computer didn't save. I do know that we used this as her hair dye . . .


Loved doing this Halloween look! What are you going to be for Halloween this year? Comment below and let me know if there are any looks you would like to see before Halloween and I'll do my best to get them up!
Tuesday, October 22, 2013
Date Night Makeover
My sister Ashli and my brother Austin are going on a date tonight to a haunted house. So of course I had to do Ashli's makeup! It was perfect timing because I wanted to start taking before and after pictures of my work. SO HERE THEY ARE :) There is also a description on all the products used for this look and how to recreate it yourself. Let me know what you think and if you have any looks you would like to see me do!


1- I started off by priming her face with the Loreal Miracle Blur. This product is awesome at filling in fine lines and shrinking pores!
2- Then I applied Covergirl's 3 in 1 foundation all over her face with a Kabuki brush.
3- This is the Mineral Fusion Duo Concealer in Cool. (I actually applied this concealer before the foundation, but I mixed up the numbers.) I used the salmon color on the bottom to cover up her under eyes. Then used the top color to cover up any blemishes. I do this step before foundation because it makes for a more seamless coverage.
4- Then I used the Bobbi Brown Natural Finish Long Lasting Foundation in Warm Ivory to highlight her cheek bones, a little on the forehead, down the bridge of her nose, on her cupid's bow, and the middle of her chin. Then blended into the rest of her foundation.
5- I set the highlighted areas with Make Up Forever's HD Setting Powder. I used a powder brush to press it onto these areas. This powder is the best! It makes the makeup last all day and makes sure the makeup doesn't crease or settle into fine lines.
6- I contoured with Sephora's bronzing powder in Los Cabos. I used it under the cheek bones to add definition and slenderize the face. Under her jawbone to add definition as well as the top of her forehead by her hair line to add dimension.
7- Then I used the Mineral Fusion blush in Pale. Its a perfect rose color for most skin types. I added this to the apples of her cheeks and blended into the bronzer.
8- I set all of that with a light dusting of Rimmel London's Stay Matte Powder in the color Sandstorm.
9- And last but not least, I added a little bit of Physician's Formula Translucent Pearl Powder to highlight. Do this on the top of the cheek bones, down the bridge of the nose, and the cupid's bow.

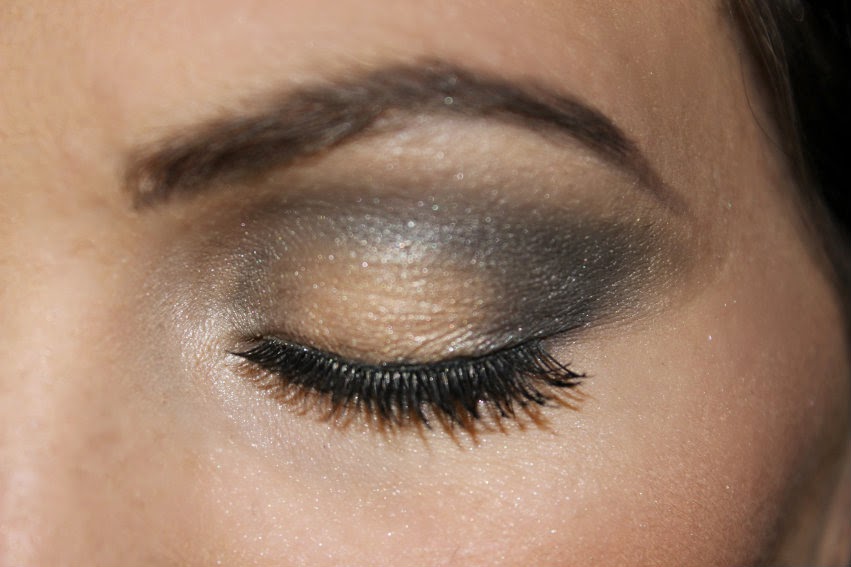
1- I first primed the eyes with Urban Decay's Primer Potion. It will make your eye makeup last all day without creasing.
2- Then I filled in her eyebrows with Rimmel London's Special Eyes Precision Liner in Brown. I used an angle brush to do this. This is one of the most important steps to a face!
I didn't do a specific number for the eye shadows. but this is when I did those. I used the Natural Eyeshadow Pallet from elf, and the champagne color from the Maybelline trio shadow.
1- Was the base color I placed all over the lid.
2- This was the transition color I placed first in her crease.
3- Then I added this smokey black on the outer corners and dragged the color into the crease. I made sure to blend, blend, blend! I also dragged this color underneath her eyes to create that smokey effect.
4- Last I put these two golden champagne colors on the middle of her lids to add the highlight and pop to her eyelid.
3- I prepped her eyelashes with one coat of Mary Kay's Lash Primer.
4- I then used Mary Kay's Lash Love Lengthening Mascara. I did two coats of this first.
5- Then added Revlon Lashes in Flirty with Lash Grip Adhesive using tweezers. Then I added another coat of mascara to make sure all the lashes blended together.
6- Once the glue is dry I smudged a small line over the base of the lashes to cover it all and make it look seamless.

Then last but certainly not least the lips. I kept them fairly simple because I wanted the eyes to be the focus of this look so. . .
1- I used this nude matte lipstick from elf as a base on her lips
2- Then added Maybelline's Shinylicious lipgloss in Caramelle on top for a polished look.
Now if you are reading this post and are freaking out about the amount of products used and think this is wayyyyyy to hard and too much, DONT! This was a fairly complex look for a night out, but I promise I will do some very simple everyday looks in the near future.


Ashli is already a natural beauty, but I had a lot of fun playing up her beautiful blue eyes!
Here is what we did:

2- Then I applied Covergirl's 3 in 1 foundation all over her face with a Kabuki brush.
3- This is the Mineral Fusion Duo Concealer in Cool. (I actually applied this concealer before the foundation, but I mixed up the numbers.) I used the salmon color on the bottom to cover up her under eyes. Then used the top color to cover up any blemishes. I do this step before foundation because it makes for a more seamless coverage.
4- Then I used the Bobbi Brown Natural Finish Long Lasting Foundation in Warm Ivory to highlight her cheek bones, a little on the forehead, down the bridge of her nose, on her cupid's bow, and the middle of her chin. Then blended into the rest of her foundation.
5- I set the highlighted areas with Make Up Forever's HD Setting Powder. I used a powder brush to press it onto these areas. This powder is the best! It makes the makeup last all day and makes sure the makeup doesn't crease or settle into fine lines.
6- I contoured with Sephora's bronzing powder in Los Cabos. I used it under the cheek bones to add definition and slenderize the face. Under her jawbone to add definition as well as the top of her forehead by her hair line to add dimension.
7- Then I used the Mineral Fusion blush in Pale. Its a perfect rose color for most skin types. I added this to the apples of her cheeks and blended into the bronzer.
8- I set all of that with a light dusting of Rimmel London's Stay Matte Powder in the color Sandstorm.
9- And last but not least, I added a little bit of Physician's Formula Translucent Pearl Powder to highlight. Do this on the top of the cheek bones, down the bridge of the nose, and the cupid's bow.

1- I first primed the eyes with Urban Decay's Primer Potion. It will make your eye makeup last all day without creasing.
2- Then I filled in her eyebrows with Rimmel London's Special Eyes Precision Liner in Brown. I used an angle brush to do this. This is one of the most important steps to a face!
I didn't do a specific number for the eye shadows. but this is when I did those. I used the Natural Eyeshadow Pallet from elf, and the champagne color from the Maybelline trio shadow.
1- Was the base color I placed all over the lid.
2- This was the transition color I placed first in her crease.
3- Then I added this smokey black on the outer corners and dragged the color into the crease. I made sure to blend, blend, blend! I also dragged this color underneath her eyes to create that smokey effect.
4- Last I put these two golden champagne colors on the middle of her lids to add the highlight and pop to her eyelid.
3- I prepped her eyelashes with one coat of Mary Kay's Lash Primer.
4- I then used Mary Kay's Lash Love Lengthening Mascara. I did two coats of this first.
5- Then added Revlon Lashes in Flirty with Lash Grip Adhesive using tweezers. Then I added another coat of mascara to make sure all the lashes blended together.
6- Once the glue is dry I smudged a small line over the base of the lashes to cover it all and make it look seamless.
Then last but certainly not least the lips. I kept them fairly simple because I wanted the eyes to be the focus of this look so. . .
1- I used this nude matte lipstick from elf as a base on her lips
2- Then added Maybelline's Shinylicious lipgloss in Caramelle on top for a polished look.
Now if you are reading this post and are freaking out about the amount of products used and think this is wayyyyyy to hard and too much, DONT! This was a fairly complex look for a night out, but I promise I will do some very simple everyday looks in the near future.
Hope you liked this look on the beautiful Ashli. Here are some more before and afters!


Thank you so much for reading. Feel free to leave me questions or comments below. You can also find me on facebook https://www.facebook.com/dusti.shepherd
or email me at makingupmom@gmail.com
Make sure to contact me to book your next makeup look. I do weddings, dances, photo shoots and more!
Sunday, October 13, 2013
A Dress Fit For a PRINCESS
eEI'm a little behind on this post, since it happened almost 2 months ago. But better late then never, right?
Daya turned 4 this August and wanted a princess party. She wanted to be Jasmine, but I didn't want to pay $50 for the ones that you buy at the Disney Store. BUT I didn't want it to look like a cheap Walmart version either (nothing against Walmart, I love Walmart, just not their dress ups.) So I went where I always go when I want to make something. . . PINTEREST! I seriously LOVE Pinterest. One might say I'm a little addicted. ANYWAY, I found this ADORABLE outfit and immediately wanted to make it.
http://www.pinterest.com/pin/201887995767845924/

For those of you who don't know I am a terrible sewer! I don't have the patience for it, nor the talent. But I was determined to make this for my little princess, no matter the pain, blood, sweat, and tears. :)
After reading every which way to make these skirts on youtube and pinterest and blogs I set out on my quest.
I went to. . .

Daya turned 4 this August and wanted a princess party. She wanted to be Jasmine, but I didn't want to pay $50 for the ones that you buy at the Disney Store. BUT I didn't want it to look like a cheap Walmart version either (nothing against Walmart, I love Walmart, just not their dress ups.) So I went where I always go when I want to make something. . . PINTEREST! I seriously LOVE Pinterest. One might say I'm a little addicted. ANYWAY, I found this ADORABLE outfit and immediately wanted to make it.
http://www.pinterest.com/pin/201887995767845924/
After reading every which way to make these skirts on youtube and pinterest and blogs I set out on my quest.
I went to. . .
From there I picked out everything I needed and since I had no real idea what I was doing I just decided to make it up as I went and here is how it turned out. . .


Over all I'm pretty happy with how it turned out. And the total cost . . . $15!
It is not professional by any means, but Daya loved it and her smile made it all worth while.
I had a lot of people ask me how I made it so I will be doing a tutorial on everything on my youtube channel soon. My niece Kinlee's birthday is this month so we are going to make one for her. Stay tuned on how to make it. :)
Friday, October 11, 2013
Happy HAULoween! MWAAAAHAHAHAHA
SOOOOOOO. . . I started making beauty videos on youtube. It all started because of my beautiful sister ASHLI!


Ashli was having me do her makeup all the time, so I decided to make simple videos for her to watch so she could learn how I did it and do it by herself. She still has me do it all the time though ;)
ANYWAY, I decided to upload them to youtube for her and anyone else to benefit from. You can check out my channel from the tab at the top that says "youtube" or simply click here
My latest video I did was a makeup HAUL from the drugstore. . . hence the "Happy HAULoween" (clever, I know)
For those of you that don't know what a haul is, its basically when you buy a bunch of products and show them. I also ended up doing a small review on the products as well. So if you want to see what I got at an affordable drugstore price and how I like them,
click here:
Hope you enjoy! And HAPPY HAULOWEEN!
Sunday, September 8, 2013
This is ME.

My favorite thing ever is my family. I am married to this stud =

We've been married 6 years and have two BEAUTIFUL children. And when I say beautiful, I mean they don't get cuter than this =

Just a few weeks ago this was me, pregnant and getting ready to have our new son =

So enough bragging about my amazing family. This blog is going to be mostly about a few of my passions and how they fit into my life while being a Mommy.
When you are a mother, so much time is focused on your children that sometimes there is little time for anything else. But, for me, I need to keep up with my passions and hobbies because there is so much more that makes up us mothers than just "cooking and cleaning."
For me that means fashion, makeup, photography, film making, singing, just to name a few. So on my blog that's what you'll get. A glimpse into these hobbies, plus some of my thoughts and insights on the world. *EXCITING, I know!* So thanks for taking an interest in my life and hope you enjoy my ride :) I sure am.
Subscribe to:
Comments (Atom)