


Ashli is already a natural beauty, but I had a lot of fun playing up her beautiful blue eyes!
Here is what we did:

2- Then I applied Covergirl's 3 in 1 foundation all over her face with a Kabuki brush.
3- This is the Mineral Fusion Duo Concealer in Cool. (I actually applied this concealer before the foundation, but I mixed up the numbers.) I used the salmon color on the bottom to cover up her under eyes. Then used the top color to cover up any blemishes. I do this step before foundation because it makes for a more seamless coverage.
4- Then I used the Bobbi Brown Natural Finish Long Lasting Foundation in Warm Ivory to highlight her cheek bones, a little on the forehead, down the bridge of her nose, on her cupid's bow, and the middle of her chin. Then blended into the rest of her foundation.
5- I set the highlighted areas with Make Up Forever's HD Setting Powder. I used a powder brush to press it onto these areas. This powder is the best! It makes the makeup last all day and makes sure the makeup doesn't crease or settle into fine lines.
6- I contoured with Sephora's bronzing powder in Los Cabos. I used it under the cheek bones to add definition and slenderize the face. Under her jawbone to add definition as well as the top of her forehead by her hair line to add dimension.
7- Then I used the Mineral Fusion blush in Pale. Its a perfect rose color for most skin types. I added this to the apples of her cheeks and blended into the bronzer.
8- I set all of that with a light dusting of Rimmel London's Stay Matte Powder in the color Sandstorm.
9- And last but not least, I added a little bit of Physician's Formula Translucent Pearl Powder to highlight. Do this on the top of the cheek bones, down the bridge of the nose, and the cupid's bow.

1- I first primed the eyes with Urban Decay's Primer Potion. It will make your eye makeup last all day without creasing.
2- Then I filled in her eyebrows with Rimmel London's Special Eyes Precision Liner in Brown. I used an angle brush to do this. This is one of the most important steps to a face!
I didn't do a specific number for the eye shadows. but this is when I did those. I used the Natural Eyeshadow Pallet from elf, and the champagne color from the Maybelline trio shadow.
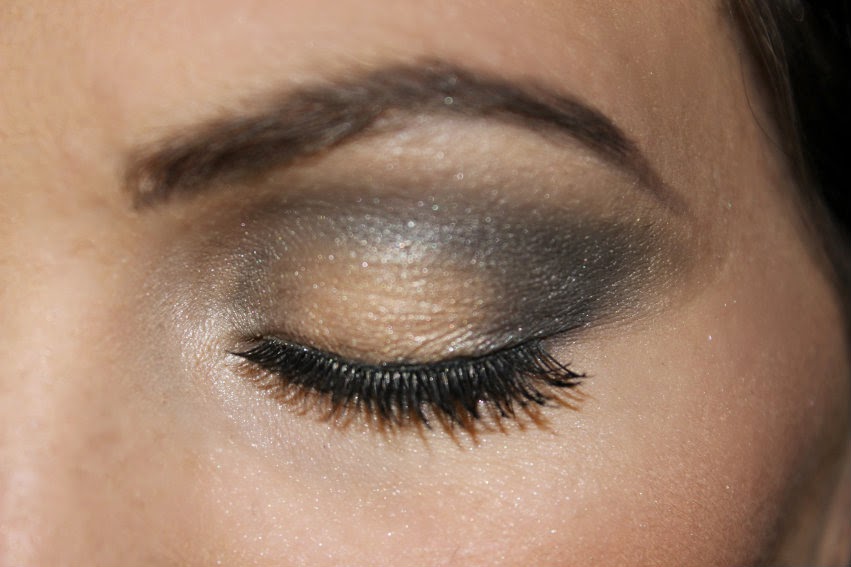
1- Was the base color I placed all over the lid.
2- This was the transition color I placed first in her crease.
3- Then I added this smokey black on the outer corners and dragged the color into the crease. I made sure to blend, blend, blend! I also dragged this color underneath her eyes to create that smokey effect.
4- Last I put these two golden champagne colors on the middle of her lids to add the highlight and pop to her eyelid.
3- I prepped her eyelashes with one coat of Mary Kay's Lash Primer.
4- I then used Mary Kay's Lash Love Lengthening Mascara. I did two coats of this first.
5- Then added Revlon Lashes in Flirty with Lash Grip Adhesive using tweezers. Then I added another coat of mascara to make sure all the lashes blended together.
6- Once the glue is dry I smudged a small line over the base of the lashes to cover it all and make it look seamless.

Then last but certainly not least the lips. I kept them fairly simple because I wanted the eyes to be the focus of this look so. . .
1- I used this nude matte lipstick from elf as a base on her lips
2- Then added Maybelline's Shinylicious lipgloss in Caramelle on top for a polished look.
Now if you are reading this post and are freaking out about the amount of products used and think this is wayyyyyy to hard and too much, DONT! This was a fairly complex look for a night out, but I promise I will do some very simple everyday looks in the near future.
Hope you liked this look on the beautiful Ashli. Here are some more before and afters!


Thank you so much for reading. Feel free to leave me questions or comments below. You can also find me on facebook https://www.facebook.com/dusti.shepherd
or email me at makingupmom@gmail.com
Make sure to contact me to book your next makeup look. I do weddings, dances, photo shoots and more!
No comments:
Post a Comment